Making an APRS iGate with a ninoTNC
Lately I’ve been getting into messaging with APRS but have noticed a problem. In my area there are no 2-way iGates that I can hit from my home. So when I try to send a message via APRS it gets to it’s destination but I don’t receive any ACKs or if that destination sends me a reply, I don’t get it. This was especially troublesome when trying to check in to APRSThursday as I’d get no response. So I decided to do something about that.
Luckily I have an extra Raspberry Pi 4B sitting around that would be perfect for this. Now it’s been quite a few years since I’ve had to do anything major in *nix so I’m a bit rusty about how to go about installing what is needed for this project. Luckily Jason, KM4ACK, has built a wonder script for hams to install a lot of useful software on a raspberry pi, called Build-a-Pi. Using Jason’s script I’ve installed various programs that I might find useful for a Ham-shack computer: VARA, Dire Wolf, FLrig, QSSTV, YAAC to name a few. In this instance we’re mostly concerned with YAAC (Yet Another APRS Client) as that’s what I’m using to control my APRS iGate.
The other piece of hardware (aside from a radio) that we’ll need is some kind of interface to go between the Pi and the radio. Typically people use some kind of external sound card (or one built into their radio) for this, along with software that takes the output of the APRS client and converts it to AX.25 packets that get sent out by the radio. Well, I don’t really want to go that route as it’s just another layer in the stack that could go wrong. Here’s where the ninoTNC come into play. The ninoTNC by TARPN is a full-fledged TNC is a small form factor, and not very costly either. What I mean by “full-fledged” is that it takes the KISS packets from your APRS client and directly converts them to AX.25 packets for use with APRS, without having to have that extra software layer. The ninoTNC will also handle some other modes, like IL2P, but for APRS use we’re only interested in 1200 baud AX.25.
The ninoTNC is available either as a fully built and tested surface-mount board, or if you’re more adventurous, a through-hole DIY kit, which is the route I went. For the DIY kit, you first need to purchase the circuit board and CPU from Etsy, and then buy the needed parts from a supplier like DigiKey or Mouser. The parts list can be found on the ninoTNC assembly page. They make it easy for you by providing a CSV file with all the parts and item numbers that you just upload to Mouser and it puts everything in your cart for you.
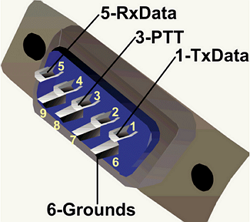
Finally you’ll need to buy or make a cable to go between the ninoTNC and your radio. My radio is an Icom IC-207h that uses a mini-Din6 connector, and the ninoTNC is a DB9 connector. Using some solderable DB9 connectors and hacking one end off a PS/2 cable I fabricated a cable for my setup.
Now we need to setup YAAC to find our ninoTNC and send/receive APRS packets. The first time you run YAAC it will step you through a wizard to get things set up. The first step is setting your callsign and SSID.
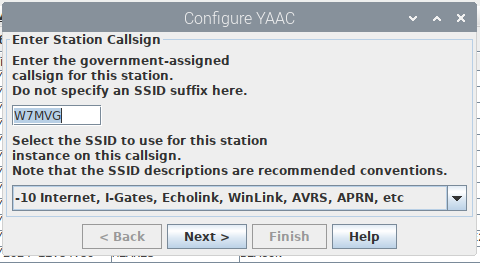
In the top field enter your callsign without any SSID. Using the drop-down box below, specify your SSID. For iGates -10 is recommended. Click Next to proceed.
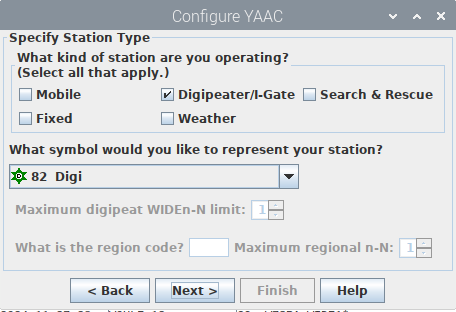
Select the type of station you’re setting up. In this case I’m choosing “Digipeater/I-Gate”. Then choose the symbol for your station. I’m using the green star digi symbol with a D overlay. Another option would be the black diamond “gateway” symbol since it’s going to be an iGate gateway. Click Next to proceed.

In this step you would setup your GPS if you have one. I do not and this is a fixed station so I Just manually input the coordinates. Click Next to continue.
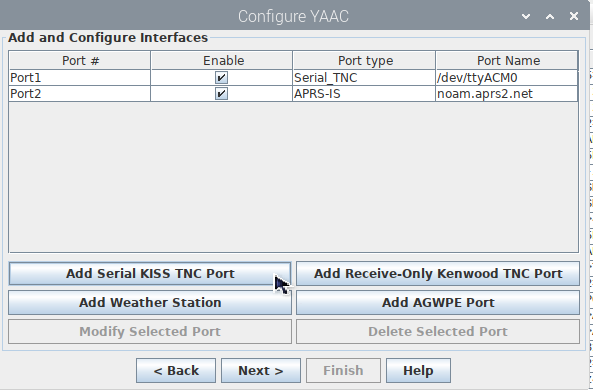
Now we come to the fun part. This is where we’ll setup our ports. We’ll need 2 ports. One to talk to the ninoTNC, and one to talk to the APRS-IS servers so that we can send received packets to the internet, and conversely send specific packets from the internet out on RF. First, let’s look at the TNC port. To do this, we’ll need to know what port our ninoTNC is on the raspberry pi. (you did plug it in right?). Open a command prompt window on your rpi and type in dmesg | grep “tty” this will give you a list of system messages that contain tty in them.
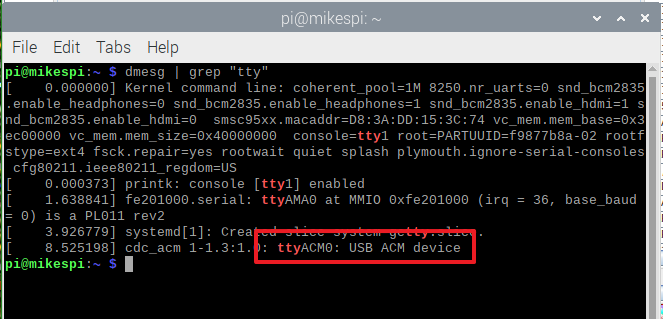
Here we’re looking for the USB port that the ninoTNC is attached to. As you can see above mine is on ttyACM0. Remember that or write it down, we’ll need it in a minute. Back in the YAAC wizard, click on the Add Serial KISS TNC Port button.
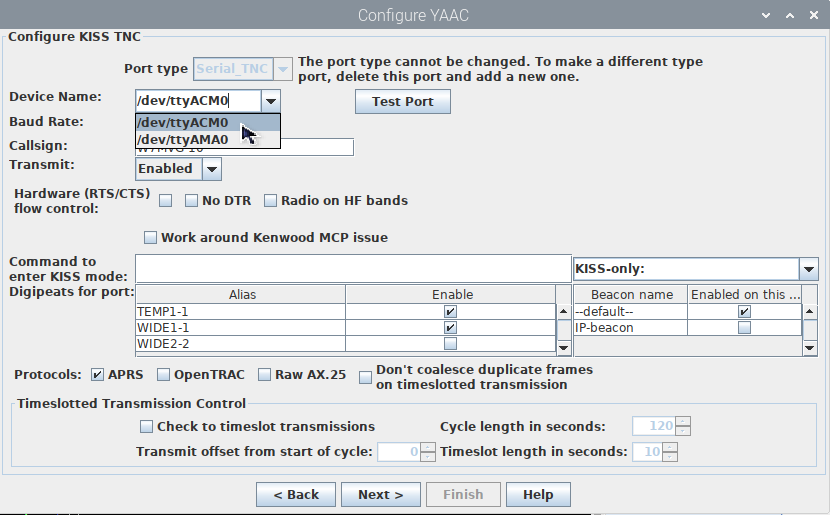
Under the Device Name look for the option that matches what you found previously. For me it’s /dev/ttyACM0. Set the baud rate to 57600, then enter your callsign and SSID in the callsign field. This should match what you entered in step 1. Finally, set the transmit drop-down to Enabled to allow YAAC to transmit through your radio.
To Be Continued…..